
17 ITEMSVIEW CART


Total: 1,365.00
Expert Support
Full Speed
100% Working
50 USD
List of Files:
FENDT Tractors e100 e107 V Vario Maintenance Manual V224EP002W01A.pdf (116 Pages)
Table of Contents
1 Safety instructions
1.1 Introduction
1.1.1 Operator’s Manual and safety instructions
1.1.2 Intended use
1.1.3 Maintenance, replacement parts and accessories
1.2 Basic safety instructions
1.2.1 Safety icons, warning symbols and terms
1.2.2 Compliance with the operator’s manual
1.3 Safety instructions
1.3.1 Compliance with the safety instructions
1.3.2 Safety equipment and components
1.3.3 Missing safety guards
1.3.4 Understand the machine functions
1.3.5 Personal protective clothing and precautions
1.3.6 Cab entrance and emergency exit
1.3.7 Safety when you go out of the cab
1.3.8 Phone numbers to use in an emergency
1.3.9 How to prevent a fire
1.4 Safety decals on the tractor
1.4.1 Safety instructions for the safety decals
1.4.2 Safety decal location and important safety instructions
1.5 High-voltage system
1.5.1 High-voltage safety instructions
1.5.2 High-voltage health risks
1.5.3 Who can work on the high-voltage system
1.5.4 The voltage level and types of current used on the machine
1.5.5 How to identify high-voltage components
1.5.6 How to identify high-voltage cables
1.5.7 High-voltage battery safety
1.5.8 High-voltage capacitor safety
1.5.9 Safe temperature limits of the high-voltage system
1.5.10 Safety when you charge the high-voltage battery
1.5.11 High-voltage system – precautions after the machine is set to OFF
1.5.12 High-voltage system – precautions after the tractor is de-energized
1.5.13 Safe maintenance
1.5.13.1 Precautions when you do maintenance on the machine
1.5.13.2 Maintenance near an external high-voltage source
1.5.13.3 Lubricants specified for high-voltage components
1.5.14 Machines with a high-voltage system – precautions when you tow the machine
1.5.15 Do the correct procedure if damage to the high-voltage system occurs
1.5.16 What to do in an emergency
1.5.17 Installation of more electrical and electronic equipment
1.5.18 Tractor modifications
1.5.19 Machines with a high-voltage system – precautions when you clean the machine
1.5.20 Auxiliary battery control of the high-voltage system
1.6 Safety instructions before you start the tractor
1.6.1 Protection of other persons
1.6.2 Precautions before you start the machine
1.6.3 Precautions after you start the machine
1.7 Safe operation of the tractor
1.7.1 General instructions
1.7.2 Passengers in the cab while the machine is in operation
1.7.3 Children and persons not approved to operate the machine
1.7.4 Protection of the tractor operator and passengers
1.7.5 Precautions to prevent the overturn of the machine
1.7.6 Safe operation of the machine
1.7.7 Safe operation of the machine steering
1.7.8 Safe operation of the tractor in a forest
1.7.9 Safe operation of the tractor when you do work near an external high-voltage source
1.7.10 Safe operation of the PTO
1.7.11 Safety equipment
1.7.12 Operator’s cab
1.7.12.1 Cab
1.7.12.2 Protection against objects penetrating the operating area from the side
1.7.12.3 Protection against hazardous substances penetrating the inside of the cab Category 2
1.7.12.4 Protection against hazardous substances penetrating the inside of the cab Category 4
1.8 Transport precautions
1.8.1 Precautions when you tow the tractor
1.8.2 Implements and trailers
1.9 Tire safety
1.10 Maintenance
1.10.1 General maintenance instructions
1.10.2 Dangerous materials
1.10.3 Fluids that are dangerous to the environment
2 Maintenance
2.1 Introduction
2.2 Maintenance schedule
2.3 Lubrication chart
2.3.1 Lubrication points on the machine
2.4 Cooling system
2.4.1 Clean the condensers and cooling fans
2.4.2 Examine the level of the coolant
2.5 Front axle
2.5.1 Replace the oil in the drive hubs of the front axle
2.6 Steering system
2.6.1 Steering
2.6.2 Examine the toe-in
2.7 Drive train system
2.7.1 Transmission
2.7.1.1 Examine the level of the transmission oil
2.7.1.2 Replace the transmission oil
2.7.1.3 Replace the pressure and suction filters
2.7.1.4 Replace the transmission air vent filter
2.7.2 Final drives
2.7.2.1 Replace the final drive oil
2.8 Compressed air system
2.8.1 Replace the air dryer cartridge
2.9 Hydraulic system
2.9.1 Examine the oil level in the hydraulic system
2.9.2 Replace the hydraulic oil
2.9.3 Replace the hydraulic air vent filter
2.9.4 Replace the hydraulic system filter
2.9.5 Replace the filter for the pilot pressure system
2.10 Electrical system
2.10.1 AGM battery
2.10.2 Adjust the front head lamps
2.10.3 Adjust the work lamps
2.10.4 Fuses
2.10.4.1 General fuses
2.10.4.2 Fuses and relays
2.11 Cabin
2.11.1 Fill the windshield washers
2.12 Air-conditioning and heating system
2.12.1 Clean the condenser
2.12.2 General
2.12.3 Change the fresh air filter category 2 and category 4
2.12.3.1 Change the category 2 fresh air filter
2.12.3.2 Preparation to change the fresh air filter category 4
2.12.4 Reset the operating hours for a fresh air filter category 4
2.12.5 Replace the recirculation filter
2.13 Chassis
2.13.1 Open the cooling system cover
2.14 Implement drive system
2.14.1 Replace the front PTO oil
2.14.2 Lubricate the front PTO
2.15 Clean the machine
2.15.1 Introduction
2.15.2 Clean the displays
2.15.3 Use wax to prevent rust
Index
FENDT Tractors e100 e107 V Vario Operation Manual V224EP001B01A.pdf (331 Pages)
Table of Contents
1 Safety
1.1 Introduction
1.1.1 Operator’s Manual and safety instructions
1.1.2 Intended use
1.1.3 Maintenance, replacement parts and accessories
1.2 Basic safety instructions
1.2.1 Safety icons, warning symbols and terms
1.2.2 Compliance with the operator’s manual
1.3 Safety instructions
1.3.1 Compliance with the safety instructions
1.3.2 Safety equipment and components
1.3.3 Missing safety guards
1.3.4 Understand the machine functions
1.3.5 Personal protective clothing and precautions
1.3.6 Cab entrance and emergency exit
1.3.7 Safety when you go out of the cab
1.3.8 Phone numbers to use in an emergency
1.3.9 How to prevent a fire
1.4 Safety decals on the machine
1.4.1 Safety instructions for the safety decals
1.4.2 Safety decal location and important safety instructions
1.5 High-voltage system
1.5.1 High-voltage safety instructions
1.5.2 High-voltage health risks
1.5.3 Who can work on the high-voltage system
1.5.4 The voltage level and types of current used on the machine
1.5.5 How to identify high-voltage components
1.5.6 How to identify high-voltage cables
1.5.7 High-voltage battery safety
1.5.8 High-voltage capacitor safety
1.5.9 Safe temperature limits of the high-voltage system
1.5.10 Safety when you charge the high-voltage battery
1.5.11 High-voltage system – precautions after the machine is set to OFF
1.5.12 High-voltage system – precautions after the tractor is de-energized
1.5.13 Safe maintenance
1.5.13.1 Precautions when you do maintenance on the machine
1.5.13.2 Maintenance near an external high-voltage source
1.5.13.3 Lubricants specified for high-voltage components
1.5.14 Machines with a high-voltage system – precautions when you tow the machine
1.5.15 Do the correct procedure if damage to the high-voltage system occurs
1.5.16 What to do in an emergency
1.5.17 Tractor modifications
1.5.18 Machines with a high-voltage system – precautions when you clean the machine
1.5.19 Auxiliary battery control of the high-voltage system
1.6 Safety instructions before you start the machine
1.6.1 Protection of other persons
1.6.2 Precautions before you start the machine
1.6.3 Precautions after you start the machine
1.7 Safe operation of the machine
1.7.1 General instructions
1.7.2 Passengers in the cab while the machine is in operation
1.7.3 Children and persons not approved to operate the machine
1.7.4 Protection of the tractor operator and passengers
1.7.5 Precautions to prevent the overturn of the machine
1.7.6 Safe operation of the machine
1.7.7 Safe operation of the machine steering
1.7.8 Safe operation of the tractor in a forest
1.7.9 Safe operation of the tractor when you do work near an external high-voltage source
1.7.10 Safe operation of the PTO
1.7.11 Safety equipment
1.7.12 Operator’s cab
1.7.12.1 Cab
1.7.12.2 Protection against objects penetrating the operating area from the side
1.7.12.3 Protection against hazardous substances penetrating the inside of the cab Category 2
1.7.12.4 Protection against hazardous substances penetrating the inside of the cab Category 4
1.7.13 Additional cab filtration safety information
1.7.13.1 National health and safety recommendations
1.7.13.2 Operator Enclosures as Part of an Occupational Health and Safety Management System (OHSMS)
1.7.13.3 Hierarchy of Controls
1.7.13.4 Continuous Improvement Cycle
1.7.13.5 Limitations of Cabs Used in Hazardous Environments
1.7.13.6 The Cab as an Engineering Control
1.8 Transport precautions
1.8.1 Implements and trailers
1.9 Tire safety
1.10 Maintenance
1.10.1 General maintenance instructions
1.10.2 Fluids that are dangerous to the environment
2 Introduction
2.1 High-voltage system
2.1.1 High-voltage system overview
2.2 Basic terminal controls
2.2.1 Machine functions menu
2.2.2 General settings
2.2.3 Multifunction armrest
2.2.3.1 Menu for the multifunction armrest controls
2.2.3.2 Delete a function
2.2.3.3 Enable a function
2.2.4 Counter menu
2.2.4.1 Counter menu overview
2.2.4.2 Process icons for the counter menu
3 Operation
3.1 Do a check each day before you operate the machine
3.1.1 Examine the level of the coolant
3.1.2 Examine the compressed air system for leaks
3.1.3 Drain the water from the air receiver
3.1.4 Examine the level of the transmission oil
3.2 Automatic start and stop functions of the machine
3.2.1 Automatic start and stop functions
3.2.2 Select the automatic start and stop function
3.2.3 Button – auto off
3.3 Start the electrical system of the machine
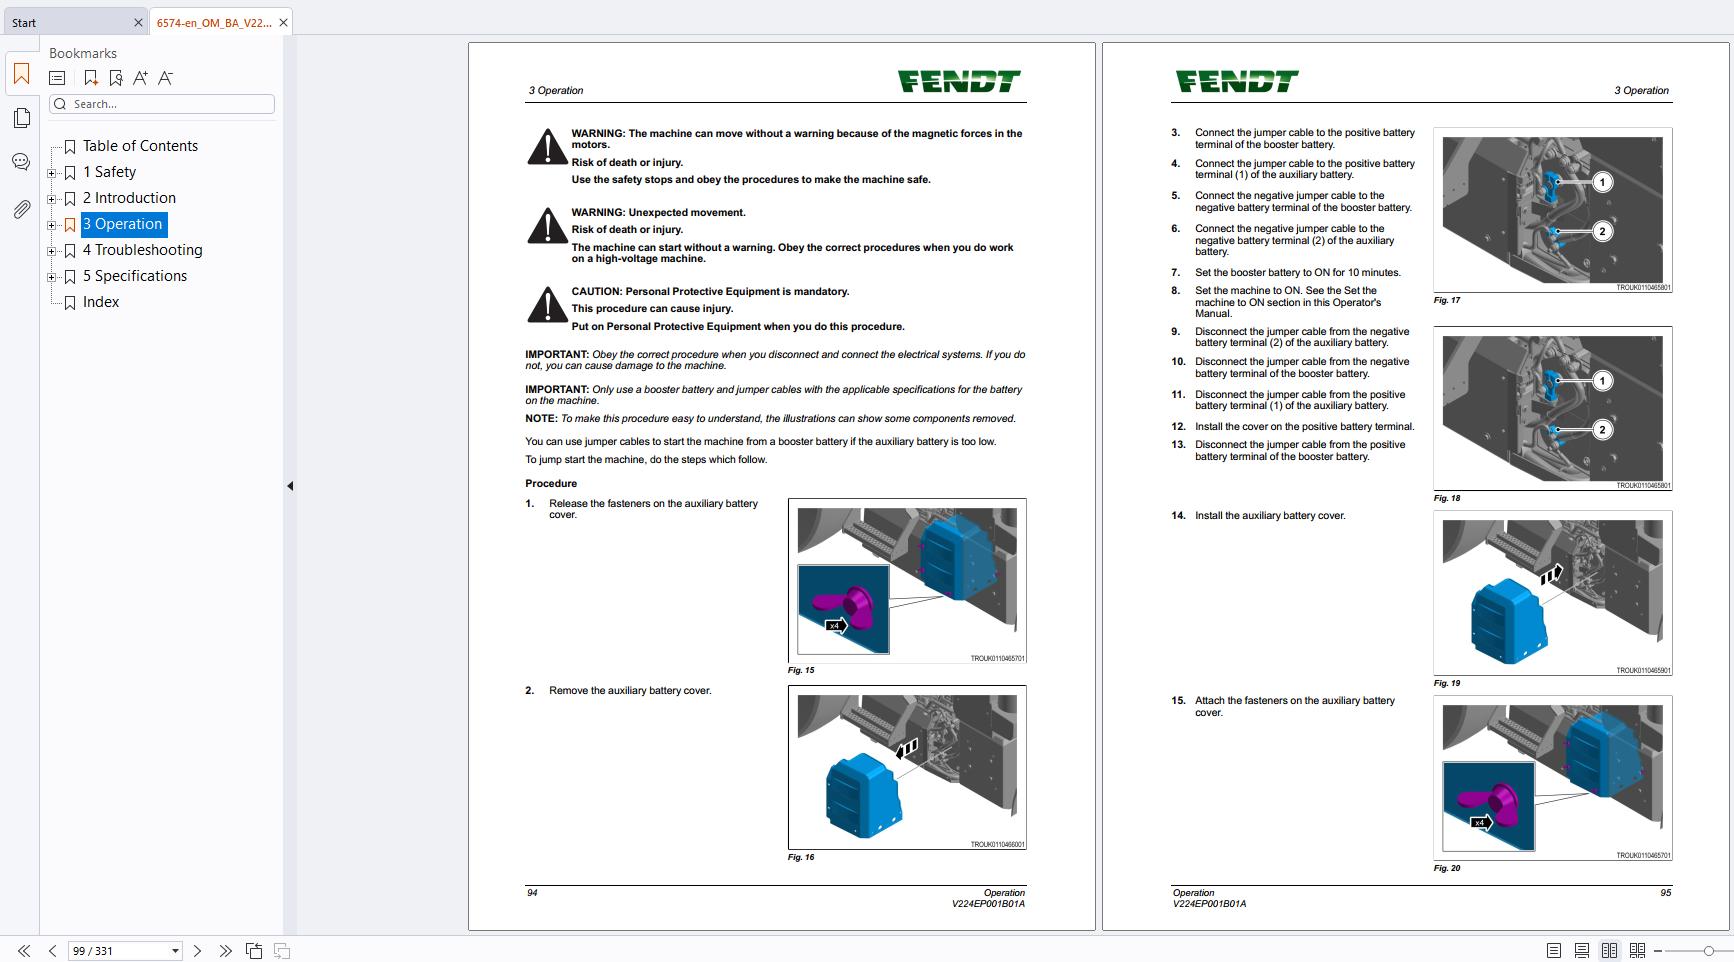
3.3.1 Precautions before you start the electrical system of the tractor
3.3.2 Set the machine to ON
3.3.3 Jump start the machine
3.4 Stop the electrical system of the machine
3.4.1 Set the machine to OFF
3.4.2 Stop the electric motor with the instrument panel ON
3.4.3 Storage precautions
3.5 Operator’s seat
3.5.1 Ergonomic posture when driving
3.5.2 Vibration
3.5.3 Adjustment of the operator’s seat
3.6 Display instruments and operation controls
3.6.1 Control switch for the high-voltage battery charger
3.6.2 Lamps and horn controls
3.6.3 Windshield wiper controls
3.6.4 Steering wheel adjustment
3.6.5 Forward-neutral-reverse direction lever
3.6.6 Terminal display
3.6.7 Instrument panel
3.6.8 Comfort Control Module (CCM)
3.6.9 Armrest
3.6.10 Joystick
3.6.11 Cross shift lever
3.6.12 3L Joystick
3.6.13 Switches below the joystick
3.6.14 Implement control module
3.7 Sockets
3.7.1 Sockets in the cab
3.7.2 Rear sockets
3.8 High-voltage battery charger
3.8.1 Overview of the high-voltage battery from the terminal
3.8.2 Connect the high-voltage battery charger cable
3.8.3 Charge the high-voltage battery on the machine
3.8.4 Disconnect the high-voltage battery charger cable
3.8.5 Emergency release of the high-voltage battery charger cable
3.8.6 Status of the high-voltage battery charge – instrument panel
3.8.7 Set the timer for the battery charger
3.8.8 Status of the high-voltage battery charger – on the terminal
3.8.9 Status of the high-voltage battery charger – instrument panel
3.8.10 Status of the high-voltage battery charger – charge socket
3.9 Air-conditioning and heating system
3.9.1 Warnings and general information
3.9.2 Use in environment with dust conditions and protection against hazardous substances
3.9.3 Diffusers
3.9.4 Operation of the air-conditioning and heating system
3.9.5 Operation of the EN 15695-1 category 4 ventilation system
3.9.6 Operate the floor heater (option)
3.9.7 Windshield and rear window heater (option)
3.9.8 Operation of the seat heater
3.10 Windshield wipers
3.10.1 Operate the front windshield wiper and washer
3.10.2 Operate the rear windshield wiper and washer
3.11 External rear view mirror
3.11.1 Adjust the rear view mirrors
3.12 Transmission and drive
3.12.1 Select the neutral position
3.12.2 Set the rate of acceleration
3.12.3 Select a rate of acceleration
3.12.4 Drive operation
3.12.4.1 Drive forward from a stationary position
3.12.4.2 Drive rearward from a stationary position
3.12.5 Travel direction change
3.12.5.1 Travel direction change – control functions
3.12.5.2 Change the direction of travel with the direction control lever
3.12.5.3 Change the direction of travel with the joystick
3.12.5.4 Set the memory function for the tractor speed when you select a direction of travel
3.12.6 Cruise control drive
3.12.6.1 Cruise control
3.12.6.2 Use the cruise control function
3.12.6.3 Use the memory function for the cruise control
3.12.7 Use the electric motor speed 1 or 2
3.12.8 Calibrate the speed display
3.12.9 Turbo clutch function
3.12.10 Clutch pedal
3.12.11 Select the values for the load limit control
3.13 Machine management system
3.13.1 Tractor management system – control functions
3.13.2 Set the Tractor Management System (TMS) to ON
3.13.3 Engage the throttle pedal mode
3.14 Four-wheel drive
3.14.1 Permanent 4WD ON/OFF
3.14.2 Four-wheel drive automatic mode
3.15 Differential lock
3.15.1 Differential lock ON/OFF
3.15.2 Differential lock automatic mode ON/OFF
3.16 Front axle suspension
3.16.1 Front axle suspension – suspension mode
3.16.2 Front axle suspension – manual mode
3.16.3 Front axle suspension – lock mode
3.17 Brakes
3.17.1 General
3.17.2 Regenerative braking
3.17.3 Brake system
3.17.4 Parking brake (hand brake)
3.17.5 EU control position – Vehicle combination brake test (towing vehicle and trailer)
3.17.6 Hydraulic trailer brake (optional)
3.17.6.1 Hydraulic trailer brake
3.17.6.2 Remove the pressure from the hydraulic trailer brake
3.17.6.3 Connect the hydraulic trailer brake
3.17.7 Pneumatic trailer brakes
3.17.8 Connect the hoses for the pneumatic trailer brake
3.18 Steering
3.18.1 Steering wheel adjustment
3.19 Light systems
3.19.1 Set the road lamps to ON
3.19.2 Set the work lamps to ON
3.19.3 Set the memory function for the work lamps
3.19.4 Rotary beacon
3.20 Hydraulic system
3.20.1 Understand the precautions before you operate the hydraulic functions
3.20.2 Hydraulic valve identification
3.20.3 Hydraulic connections
3.20.4 Hydraulic couplings
3.20.5 Disable the hydraulic valves
3.20.6 Enable the hydraulic valves
3.20.7 Operate the hydraulic valves
3.20.8 Terminal hydraulic valve controls
3.20.8.1 Functions and icons of the hydraulic valves
3.20.8.2 Operate the third and fourth hydraulic functions from the terminal
3.20.8.3 Set the linear modules
3.21 Front 3-point linkage
3.21.1 Front 3–point linkage — overview
3.21.2 Set the top link to the work position
3.21.3 Set the bottom links to the work position
3.21.4 Set the bottom link to the transport position
3.21.5 Remove the bottom link
3.21.6 Lock the bottom link hooks
3.22 Front 3-point linkage – operation
3.22.1 Operating modes
3.22.2 External controls of the front 3-point linkage
3.22.3 Armrest controls for the front 3-point linkage
3.22.4 Menu for the 3-point linkage on the terminal
3.22.5 Select the menu page on the terminal for the front 3–point linkage
3.22.6 Lock/unlock the front power lift
3.22.6.1 Lock the front 3-point linkage from the implement control module
3.22.6.2 Unlock the front 3-point linkage from the implement control module
3.22.6.3 Lock the front 3-point linkage from the terminal
3.22.6.4 Unlock the front 3-point linkage from the terminal
3.22.6.5 Use the armrest controls to install an implement to the front 3-point linkage
3.22.7 Front 3-point linkage settings
3.22.7.1 Front linkage settings
3.22.7.2 Set the speed to lift the front 3-point linkage
3.22.7.3 Set the speed to lower the front 3-point linkage
3.23 Rear 3-point linkage
3.23.1 Top link
3.23.2 Lower link hook locking
3.23.3 Vario E100 – mechanical adjustments for the hydraulic system
3.23.3.1 Lateral limit for the bottom links
3.23.4 Vario E100 – mechanical adjustments
3.23.4.1 Adjustable positions of the rear 3-point linkage
3.23.4.2 Set the lateral limit of the bottom links
3.23.4.3 Set the lateral movement of the bottom links
3.23.4.4 Set the angle of the bottom links
3.24 Rear 3-point linkage – operation
3.24.1 Operating modes
3.24.2 External controls for the rear 3–point linkage
3.24.3 Armrest controls for the rear 3–point linkage
3.24.4 Select the menu page on the terminal for the rear 3–point linkage
3.24.5 Menu for the 3–point linkage on the terminal
3.24.6 Lock and unlock the rear power lift
3.24.6.1 Lock the rear 3–point linkage at the armrest
3.24.6.2 Unlock the rear 3–point linkage at the armrest
3.24.6.3 Lock the rear 3–point linkage with the terminal
3.24.6.4 Unlock the rear 3–point linkage with the terminal
3.24.7 Set the parameters for the relief control
3.24.8 Set the rear 3–point linkage to the floating position
3.24.9 Set the parameters for the shock load stabilizing system
3.24.10 Set the parameters for the rear PTO in automatic mode
3.24.11 Depth control
3.24.11.1 Set and adjust the set point for the memo position
3.24.11.2 Use the terminal to select the height memory function 1 or 2
3.24.11.3 Use the rocker switch to select the height memory position 1 or 2
3.24.12 Use the armrest controls to install an implement to the rear 3–point linkage
3.24.13 Set the transport position height of the rear 3–point linkage
3.24.14 Hydraulic system
3.24.14.1 Operating status on Mini-Display
3.24.15 Automatic mode
3.24.15.1 Set the rear 3–point linkage to the automatic mode
3.24.15.2 Joystick controls in automatic mode
3.24.16 Rear 3-point linkage settings
3.24.16.1 Rear 3–point linkage settings
3.24.16.2 Set the travel limits
3.24.16.3 Set the speed to lift the rear 3–point linkage
3.24.16.4 Set the speed to lower the rear 3–point linkage
3.24.16.5 Set the traction position of the rear 3–point linkage on the terminal
3.25 PTO
3.25.1 PTO overview
3.25.2 Rear PTO
3.25.2.1 Rear PTO — overview
3.25.2.2 Select the rear PTO speed
3.25.2.3 Start and stop the rear PTO
3.25.2.4 Operate the rear PTO when the tractor is stationary
3.25.3 Front PTO (optional)
3.25.3.1 Front PTO — overview
3.25.3.2 Start and stop the front PTO
3.25.3.3 Operate the front PTO when the machine is stationary
3.25.4 PTO automatic mode
3.25.4.1 Set a PTO to automatic mode
3.25.4.2 Joystick controls in automatic mode
3.25.4.3 Select the limits for the front PTO in automatic mode
3.25.4.4 Select the limits for the rear PTO in automatic mode
3.26 Hitch device
3.26.1 General
3.26.2 Calculation of towing capacity
3.26.3 Technical data of towing devices
3.26.4 Sign plate for the trailer hitch bracket
3.26.5 Manual hitch
3.26.5.1 Install the manual hitch
3.26.5.2 Adjust the manual hitch
3.26.5.3 Remove the manual hitch
3.26.5.4 Sign plate for the manual hitch
3.26.6 Automatic hitch
3.26.6.1 Automatic hitch (optional)
3.26.6.2 Adjust the automatic hitch
3.26.6.3 Operate the automatic hitch
3.26.6.4 Sign plate for the automatic hitch
3.26.7 CUNA hitch (Italy)
3.26.7.1 CUNA hitch (optional)
3.26.7.2 Install the CUNA hitch
3.26.7.3 Adjust the CUNA hitch
3.26.7.4 Remove the CUNA hitch
3.27 Compressed air system
3.27.1 Compressed air supply display
3.27.2 Compressed air dryer
3.28 Track width
3.28.1 Track width adjustment
3.28.2 Set the track width for the front wheels
3.28.3 Set the track width for the rear wheels
3.29 Tires
3.29.1 Tire pressures
3.29.2 Tire combinations
3.30 Fendt TI
3.30.1 Introduction
3.30.2 Joystick
3.30.2.1 Enable Fendt TI functions on the joystick
3.30.2.2 Key functions
3.30.3 Unlock and select a sequence
3.30.4 Sequence menu overview
3.30.5 Record a sequence
3.30.6 Use a recorded sequence
3.30.7 Use the steps of a recorded sequence
3.30.8 Sequence setup
3.30.8.1 Icon groups, icons and functions
3.30.8.2 Process icons
3.30.8.3 Select the menu to edit a sequence
3.30.8.4 Delete a sequence
3.30.8.5 Delete a step
3.30.8.6 Make a new step in a sequence
3.30.8.7 Change a step in a sequence
3.31 Ballast weights
3.31.1 General
3.31.2 Front ballast weights
3.31.3 Wheel ballast weights
3.31.4 Water ballast weight – tires
3.32 Emergency mode
3.32.1 Precautions before you transport the machine in emergency mode
3.32.2 Transmission
3.32.2.1 Use the joystick to set the transmission ratio in the emergency mode
3.32.2.2 Use the mechanical linkage to set the transmission ratio in the emergency mode
3.32.3 Tow the machine in the emergency mode
3.32.4 Hydraulic system
3.32.4.1 Emergency mode for the auxiliary spool valve
3.32.4.2 Emergency mode for the rear linkage
4 Troubleshooting
4.1 Warning and fault messages
4.1.1 Display of warnings and error messages
4.1.2 Remove the warnings and error messages
5 Specifications
5.1 Specifications
5.1.1 Fendt e100 Vario
5.1.2 Weight and dimensions
5.1.3 High-voltage system
5.1.4 Transmission
5.1.5 Front axle
5.1.6 Steering
5.1.7 Hydraulic system
5.1.8 Electric system
5.1.9 Cab
5.1.10 Air-conditioning system
5.1.11 Compressed air system
5.1.12 Tires
5.1.13 Front 3–point linkage
5.1.14 Rear 3–point linkage
5.2 Tires
5.2.1 Tire pressures
5.2.2 Change wheels/lift the machine
5.2.3 Tire specifications
5.3 Lubricants
5.3.1 Fluid quantities
5.3.2 Biodegradable hydraulic oil
Index

REALEASE :
REALEASE :
REALEASE :
REALEASE :
REALEASE :
REALEASE :
REALEASE :
REALEASE :
REALEASE :
REALEASE :
REALEASE :
REALEASE :

REALEASE :
REALEASE :
REALEASE :
REALEASE :
 Automotive - Heavy Equipment - Truck & Bus - Forklift - Crane