
8 ITEMSVIEW CART


Total: 440.00
Expert Support
Full Speed
100% Working
Original price was: 20.10Current price is: 10. USD
Contents:
A. General
A-1: Points Regarding Local Assembly
A-2: Precautions When Assembling,Tightening Torque Of Bolts,Screws And Taper Seal Holes
A-3: Separate Units (Transportation Kits)
A-4: List Of Parts Sent Individually
A-5: Assembly Procedure,Assembly Equipment,And Schedule
A-6: Kit Layout Diagram
A-7: Tools And Equipment To Be Used
B. Assembly Of Chassis
C. Installation Of Backhoe
C-1: Installation Of Boom Cylinder To Chassis
C-2: Installation Of Boom Cylinder Piping
C-3: Bleeding Air From Boom Cylinder
C-4: Boom Sub-Assembly
C-5: Installation Of Boom Assembly
C-6: Installation Of Boom Cylinder Top Pin
C-7: Connection Of Arm Assembly To Boom
C-8: Installation Of Hoses Between Boom And Chassis
C-9: Installation Of Arm Cylinder Top Pin
C-10: Bleeding Air From Arm Cylinder
C-11: Installation Of Hydraulic Hoses Between Boom And Arm
C-12: Connection Of Grease Piping Between Boom And Chassis
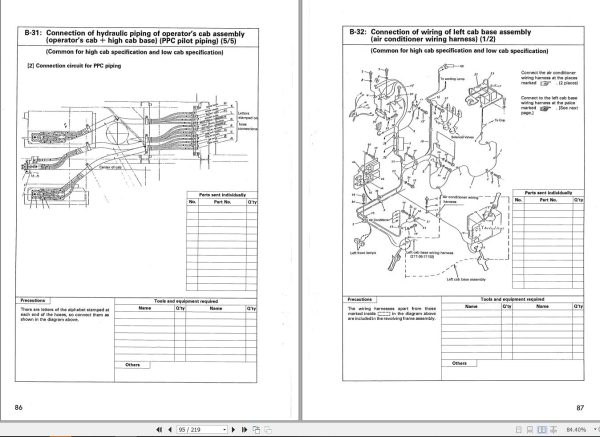
C-13: Connection Of Wiring Between Boom And Chassis
C-14: Installation Of Hoses Between Boom And Chassis
C-15: Installation Of Hydraulic Hosei,Clamps Between Boom And Chassis
C-16: Connection Of Bucket Assembly To Arm
C-17: Installation Of Bucket Link
C-18: Bleeding Air From Bucket Cylinder
D. Installation Of Loading Shovel
E. Check Of All Parts During And After Assembly
E-1: Check Of All Parts During And After Assembly With Field Assembly Inspection Report
E-2: Flush The Hydraulic Circuit As Follows

REALEASE :
REALEASE :
REALEASE :
REALEASE :

REALEASE :
REALEASE :
REALEASE :

REALEASE :
REALEASE :

REALEASE :
REALEASE :

REALEASE :
REALEASE :
 Automotive - Heavy Equipment - Truck & Bus - Forklift - Crane