
0 ITEMSVIEW CART


✓
Expert Support
✓
Full Speed
✓
100% Working
Jacobsen Reel Mower SLF1 ELiTE Safety Operation Maintenance Manual 10020773 2023
Size: 16.69 MB
Format: PDF
Language: English
Brand: Jacobsen
Type of Machine: Super Lightweight Electric Ride-on Reel Mower
Type of Manual: Safety Manual, Operation Manual, Maintenance Manual, Wiring Diagram
Model: Jacobsen SLF1 ELiTE Lithium – 3WD Super Lightweight Electric Ride-on Reel Mower
Product Code: 10018933 Series DFN
Part Number: 10020773
Publication Date: 2023
Number of Pages: 110 Pages
10 USD
- Description
Description
Contents:
1.1 Important
1.2 Product Identification
1.3 Identification Numbers
1.4 Parts Manual
1.5 Guidelines For The Disposal Of Scrap Products
2.1 General Safety Warnings
WARNING
2.1.1 Electrical Safety
2.1.2 Lawnmower Use And Care
2.1.3 Battery Machine Use And Care
2.1.4 Service
2.1.5 Work Area Safety
2.2 Operation
2.3 Roll Over Protection Structure (ROPS)
2.4 Maintenance And Storage
CAUTION
2.5 Lithium vehicle fire
CAUTION
f. Notify your local Jacobsen dealer who can advise on correct disposal & recovery of the mower. Always dispose of Hazardous waste material in accordance with local authority guidelines.
2.6 Loading Mower On To A Trailer
2.7 Important Safety Notes
WARNING
a. The Park Brake is Engaged.
b. The mow switch is in the OFF position.
c. The traction pedal is in the Neutral position.
d. The operator is in the seat.
a. Park Brake is engaged.
b. Mow switch is in the OFF position.
WARNING
a. Return traction pedal to the Neutral position.
b. Disengage all drives.
c. Lower all cutting units to the ground.
d. Engage Park Brake.
e. Power down and remove the power key.
WARNING
WARNING
WARNING
WARNING
CAUTION
3.1 Dimensions And Weights
3.2 Tyre Specification
Tyre Pressures
Product
Front Wheel
Rear Wheel
Tyre Size
Tyre Type
Tyre Pressure
Tyre Size
Tyre Type
Tyre Pressure
3WD, Smooth Tyre
22 x 12.00 – 12
Smooth 4pr
0.69 bar
(10 psi)
22 x 12.00 – 12
Smooth 4pr
0.69 bar
(10 psi)
3WD, Treaded Tyre
22 x 12.00 – 12
Treaded 4pr
0.69 bar
(10 psi)
22 x 12.00 – 12
Treaded 4pr
0.69 bar
(10 psi)
WARNING
5.8 Start Interlock – Initiate
5.9 Start Interlock – Will Not Initiate
5.10 Main Menu Navigation
5.11 View Machine Configuration Menu
5.12 Display Settings Menu
5.13 Vehicle Settings Menu
5.14 Owner PIN Menu
5.15 Configuration Settings Menu
5.16 Vehicle Speeds Menu
5.17 Actuator Recovery Menu
5.18 Wheel Size Menu
5.19 Steering Offset Calibration
5.20 Battery Reserve Menu
5.21 Change Pin Menu
5.22 Set Default Parameters Menu
5.23 Reset Service Hours Menu
5.24 Tow Mode Menu
5.25 Service Menu
5.26 Fault Log
5.27 Time Until Service
5.28 Vehicle Status
5.29 I/O Diagnostics Menu
5.30 Backlap
WARNING
5.31 Language
5.32 Warning screens
5.33 WARNING ICONS
5.34 WARNING FAULT CODES
5.35 Armrest Length Adjustment
5.36 Armrest Height Adjustment
5.37 Armrest Pivot Adjustment
CAUTION
5.38 Traction Pedal
5.39 Steering Tilt Control
5.40 Battery Isolation Switch
WARNING
6.1 Daily Inspection
CAUTION
CAUTION
6.2 Interlock System
WARNING
6.3 Operating Procedure
WARNING
CAUTION
1. Always start the mower with the operator in the seat, never while next to the mower. Never start the mower with bystanders in close proximity.
2. Keep your hands and feet away from moving parts and the cutting units. Do not adjust the mower with system power left on.
3. Do not operate the mower with loose or damaged components. All components must be correctly fastened to the mower.
4. If using the mower for the first time, cut a test area to become familiar with the operation and controls of the mower. Check the setup of the cutting units by inspecting the condition of the cut grass.
5. Prior to work, inspect the area to be cut. Check the height of the grass, the type of terrain and the conditions of the surface, plan for the safest method to cut the area and make necessary adjustments to the machine for each condition. For the b…
6. Do not discharge cut grass in the direction of people or allow people near the mower whilst in operation. The owner and operator are responsible for injuries to people and damage to property as a result of unsafe mowing practices or undue care and…
CAUTION
7. Be careful when you operate near gravel areas (roads, parking areas, cart tracks). Stones released from the equipment can cause injuries to people and cause damage to the equipment.
8. When you are not mowing grass, always turn off the mow switch.
9. Before you move across or operate on sidewalks or roads, turn off the mow switch, lift the cutting units and travel at decreased speed. Look for traffic.
10. If the mower hits an object or if vibration starts that is not normal, inspect the mower for damage and make necessary repairs.
WARNING
6.4 Activate The Mower Systems
6.5 De-Activate The Mower Systems
6.6 Driving
6.7 Mowing
WARNING
1. Move the park brake switch to the Off position and set the mow switch to the On position.
2. Push the joystick to lower the cutting units to the ground. When the cutting units are lowered, the reels will start turning.
3. Pull the joystick to lift the cutting units. The cutting units will lift to the crosscut position and the reels will stop. To lift the cutting units to the transport position, pull and hold the joystick until the cutting units are completely lifted.
NOTICE
1. Set the mow switch in the Off position, lower the cutting units to the ground, put the park brake switch in the On position and turn off the mower.
2. Tilt the grass catcher body and move the grass catcher off or on to the lift yoke.
6.8 Mowing On Slopes
WARNING
WARNING
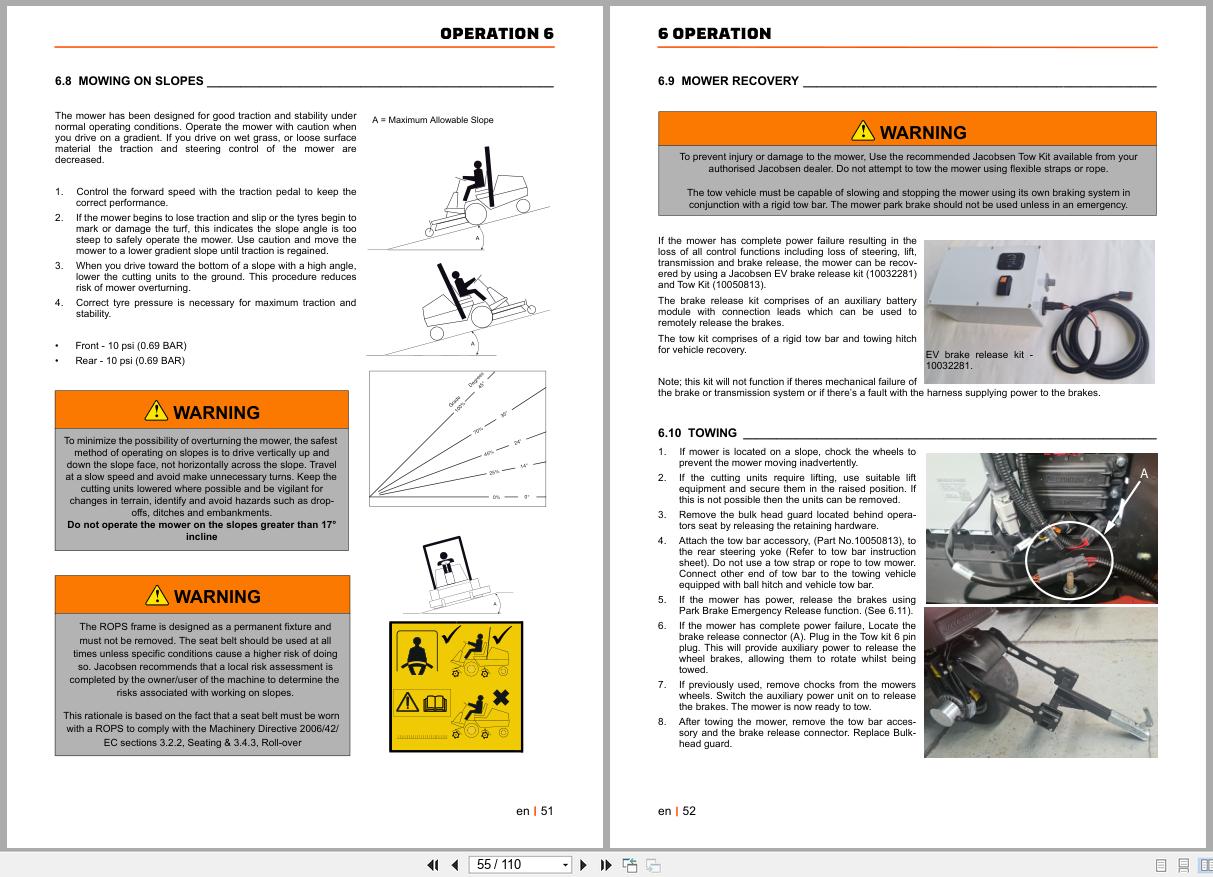
6.9 Mower Recovery
WARNING
6.10 Towing
NOTICE
WARNING
6.11 Park Brake Emergency Release
6.12 Loading Mower On Trailer
NOTICE
1. Follow procedure for disengaging parking brake.
2. Make sure reels are raised. If they cannot be raised, remove them from the mower.
3. Make certain key switch is in Off position and key removed.
4. Use a winch or other device to load mower onto trailer. Mower must be moved in a straight line to prevent damage to steering system.
5. Use tie down at rear of mower for attaching winch. If front tie downs must be used, winch must be connected to both the left and right tie downs.
6. With mower strapped down to trailer, remove brake release harness. Brake must be disengaged again before unloading mower.
7. Carefully unload mower from trailer using a winch or other device to slowly get mower down trailer ramp. Mower brakes have been disabled and are not able to stop mower.
WARNING
6.13 To Remove Blockage From Cutting Units
WARNING
6.14 Slinging and Jacking The Machine
6.15 Battery Safety
WARNING
6.16 Battery Charging And Maintenance
WARNING
WARNING
6.17 Battery Prolonged Storage
NOTICE
7.1 Maintenance And Lubrication
Maintenance Schedule
7.1.1 Lubrication
7.2 General Precautions
WARNING
1. Keep the equipment clean.
2. Keep all moving parts correctly adjusted and lubricated.
3. Replace worn or damaged parts before you operate the mower.
4. Keep guarding in position and all hardware tight.
5. Keep the tyres inflated to the recommended pressure.
7.2.2 Battery
WARNING
WARNING
WARNING
7.2.3 Tyres
CAUTION
7.2.4 Wheel Mounting Procedure
WARNING
7.2.5 ROPS
CAUTION
7.2.6 Care and Cleaning
NOTICE
CAUTION
NOTICE
WARNING
7.2.7 Backlap
7.2.8 Grinding the Bedknife
7.2.9 Steering Offset Calibration
CAUTION
7.2.10 Mower Storage
CAUTION
8.1 General Precautions
WARNING
1. Keep the equipment clean.
2. Keep all the moving parts correctly adjusted and lubricated.
3. Replace worn or damaged parts before you operate the mower.
4. Keep the guards in position and all hardware tight.
5. Keep the tyres inflated to the correct pressure.
6. Do not wear jewelry or loose fitting clothing, when you make adjustments or carry out maintenance.
8.2 Steering Chain Tension
8.3 Seat Standard
8.4 Seat Premium
WARNING
Adjust the seat to make sure all controls are within reach and will operate through the full range of movement.
8.5 Bedknife-To-Reel
CAUTION
8.6 Bedknife Adjustment
NOTICE
8.7 Cutting Height
8.8 Down Pressure
8.9 CUTTING UNIT ATTACHMENT
NOTICE
8.9.3 LIFT SYSTEM CONFIGURATION
8.9.4 Frequency Of Cut
NOTICE
8.10 Adjust FOC With Reel Speed Setting
8.11 Torque Specification
9.1 Problem Solving – General
9.2 FUSE LOCATION
10.1 Quality Of Cut Problem Solving
10.2 Step Cutting
10.3 Marcelling
10.4 Washboarding
10.5 Scalping
10.6 Stragglers
10.7 Streaks
10.8 Windrowing
10.9 Clumping
10.10 Torn Crowns
10.11 Laying Uncut Grass
11.1 Electrical Schematic
11.2 Fuses
12.1 Guarantee
Related Products
-
Ransomes Ride-on Mower T-Plex 185 Parts List 24002G
10 USDSize: 1.86 MBFormat: PDFLanguage: EnglishBrand: RansomesType of Machine: Ride-on MowerType of Manual: Parts ListModel: Ransomes T-Plex 185 Ride-on MowerEngine: kubota D722-EPart Number: 24002GNumber of Pages: 82 Pages
REALEASE :
REALEASE :
-
Ransomes Ride-on Mower T-Plex 185 Operation Safety Manual 23993G EN DA SV
10 USDSize: 5.05 MBFormat: PDFLanguage: English, Swedish, DanishBrand: RansomesType of Machine: Ride-on MowerType of Manual: Operation Manual, Safety Manual, Wiring Diagram, Hydraulic DiagramModel: Ransomes T-Plex 185 Ride-on MowerSerial Number: STPart Number: 23993GNumber of Pages: 83 Pages
REALEASE :
REALEASE :
-
Ransomes Ride-on Mower T-Plex 185 Operation Safety Manual 24034G 2000 ML
10 USDSize: 2.14 MBFormat: PDFLanguage: English, French, Dutch, German, ItalianBrand: RansomesType of Machine: Ride-on MowerType of Manual: Operation Manual, Safety Manual, Hydraulic Diagram, Wiring DiagramModel: Ransomes T-Plex 185 Ride-on MowerSeries: UL -26” Cutting Unit, US -30” Cutting Unit – Engine Kubota D722BProduct codes: LGXX006, LGXX008Part Number: 24034GPublication Date: 2000Number of Pages: 164 Pages
REALEASE :
REALEASE :
-
Walter Mauser – Kabine Mower LF-3400 to AR-522 Cab Spare Parts List 2011
10 USDSize: 1.29 MBFormat: PDFLanguage: EnglishBrand: Walter Mauser – KabineType of Machine: MowerType of Manual: Spare Parts ListModel: Walter Mauser – Kabine KS-342b For LF 4675, LF 4677, LF 3400, LF 3800, LF 550, LF 570, AR-522 MowerDocument No: 55.865.34.010Publication Date: 2011Number of Pages: 19 Pages
REALEASE :
REALEASE :
-
Ransomes Mower Fairway 250 305 405 Parts Maintenance Manual 24211GR1 2000
10 USDSize: 4.74 MBFormat: PDFLanguage: EnglishBrand: JacobsenType of Machine: Ride On Reel MowerType of Manual: Parts Manual, Hydraulic Diagram, Wiring DiagramModel: Ransomes Fairway 250, Fairway 305, Fairway 405 Ride On Reel MowerSeries: WH, WG, WF – Engine Kubota V1305-E, V1505-E, V1505-TEProduct Codes: LGZZ002, LGPP004, LHAA002Part Number: 24211GR1Publication Date: 2000Number of Pages: 122 Pages
REALEASE :
REALEASE :
-
TEXTRON Engine Suzuki 660CC EFI Service Manual 4115756
20 USDSize: 4.05 MBFormat: PDFLanguage: EnglishBrand: TEXTRONType of Machine: EngineType of Manual: Service ManualModel: TEXTRON Suzuki 660CC EFI EnginePart Number: 4115756Number of Pages: 115 PagesContents:Section 1 Electronic Fuel Injection TheorySection 2 Periodic MaintenanceSection 3 TroubleshootingSection 4 EFI EngineSection 5 Voltage TestingSection 6 Component Testing
REALEASE :
REALEASE :
-
Ransomes Mower HR-9016T Dealer Manual 2812169-ML1 2001
10 USDSize: 4.32 MBFormat: PDFLanguage: French, German, Italian, EnglishBrand: RansomesType of Machine: MowerType of Manual: Dealer ManualModel: Ransomes HR-9016 Turbo Mower4WD 70526, 4WD 70527 with ROPSEngine: Detroit Diesel D704LTPart Number: 2812169-ML1Publication Date: 2001Number of Pages: 138 Pages
REALEASE :
REALEASE :
-
Ransomes Ride-on Mower T-Plex 185 Parts Manual 24071 2000
10 USDSize: 2.94 MBFormat: PDFLanguage: EnglishBrand: RansomesType of Machine: Ride-on MowerType of Manual: Parts ManualModel: Ransomes T-Plex 185 Ride-on MowerSeries: UL -26” Cutting Unit, US -30” Cutting Unit – Engine Kubota D722BProduct Codes: LGXX006, LGXX008Part Number: 24071Publication Date: 2000Number of Pages: 110 Pages
REALEASE :
REALEASE :